GAA's Resolectric Conversion
2024 update: 20+ years after I did the conversion I decided I was tired of it and converted it back :^). See my BST-1000 Restoration page for details.
 |
 |
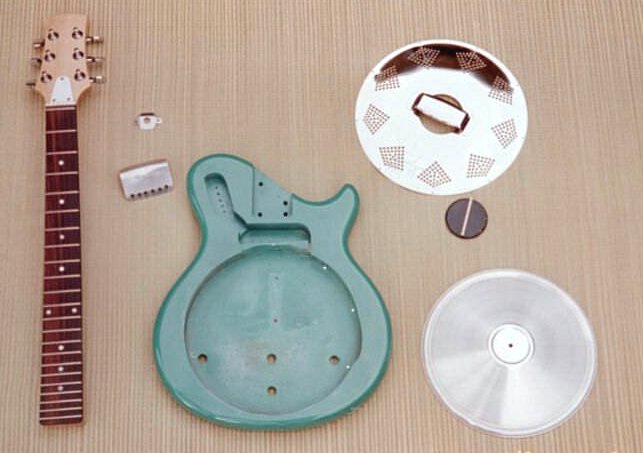
The Guitar
 . .
|
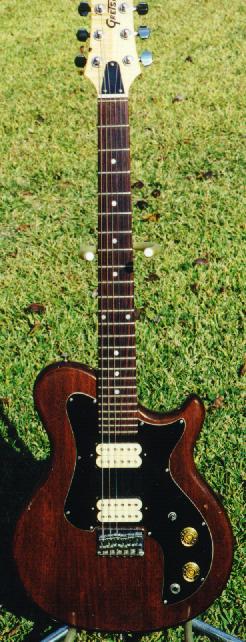
The guitar was a 20 year old Gretsch BST-1000. It has a mahogany body, bolt-on maple neck and humbuckers. Gretsch started making solid body guitars in
late 70's just before going out of business. It was my first electric.
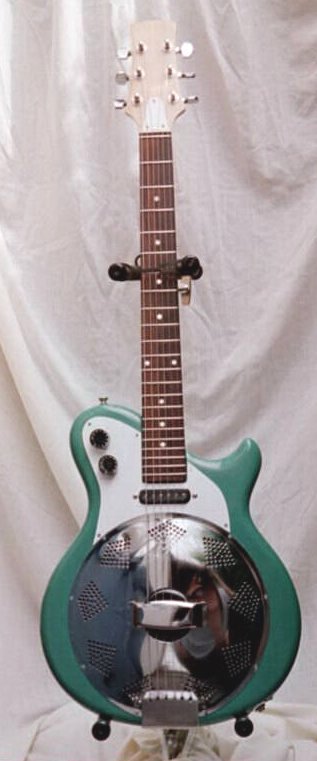
I wanted a resonator guitar and I thought it would be a fun project to
recycle my old electric into a Resolectric-style guitar.
The guitar was a less than ideal candidate for a conversion. It had a long 24 fret neck with a short 24-3/4" scale. When I centered the resonator cover over the bridge there was not enough room for a neck pickup between the end of the neck and the edge of the resonator cover. It has a Strat-like belly cut on the back which came dangerously close to intersecting the cavity for the resonator cone. It had some existing routes that the resonator cover did not hide. |
Luckily, I was able to solve all these problems by removing 5/8" from end of
neck (cutting it back to a 22 fret neck), shifting the neck down by 5/8"
in the neck pocket and shifting the bridge by the same amount. This freed
up space for a pickup, moved the cavity away from the belly cut and allowed
the resonator cover to hide the existing routes.
The Resonator Cavity
I made a very simple circle cutting jig from a 1' square of 3/8" plywood with a pie shaped piece cut out of it. When rotated about a nail at the center, the jig sweeps out a 9-1/2" diameter circle. Details of the jig can be found here.
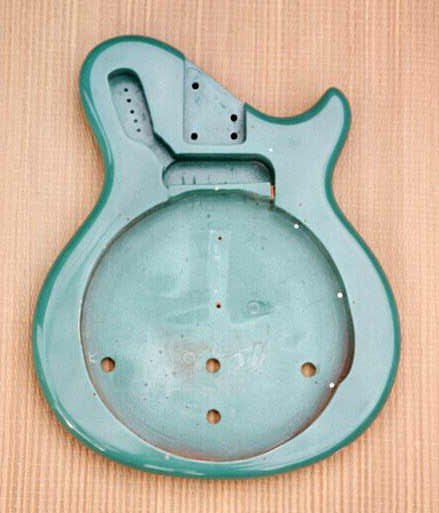 |
Before routing I removed about half of the material with a drill and a 1" spade bit. I left an "island" of wood in the center to mount the cutting jig. I used a router with a 1/2" diameter follower bit to route the cavity. The result was a very clean cavity. The cavity has the same depth as the existing routes, 1-1/8". The back of the body is about 3/8" thick after routing the cavity. The resonator cone fits snuggly with about 1/8" of play. |
Along the right side of the cavity are angled pins to hold the wiring away from the resonator cone.
There are a couple of irregularities in the cavity. At lower right side
there is a bulge where there was an existing route. I added a piece of wood at
the top fill in part of the humbucker route. Both of these are hidden by
resonator cover and pickguard.
Tailpiece and Jack Mounting Plate

I couldn't use a standard National-style tailpiece because the distance from the bridge to the end of the body is too short. I got a sheet of 22 gauge weldable steel from a hardware store and used that for the tailpiece. I cut out the tailpiece using a hack saw, bent it to shape and cleaned it up using a file and sand paper. The steel is sturdy yet it's not too difficult to cut and shape. I got a nice finish on the steel by sanding it with progressively finer grades of sandpaper from 220 to 1500 grit.
I drilled holes in the tailpiece for the string ball ends and cut small slots to hold the strings. The strings could be removed by unhooking them from the tailpiece just like a standard National tailpiece. It was very handy to be able to unstring the guitar (which I found myself doing many times) by slipping the strings out of the tailpiece rather than unwinding the strings from the tuners.
The original guitar had the jack mounted on the pickguard. I made a
mounting plate for the jack using the same material and techniques as the
tailpiece. I mounted the jack on the side of the body.
Pickguard and Electronics
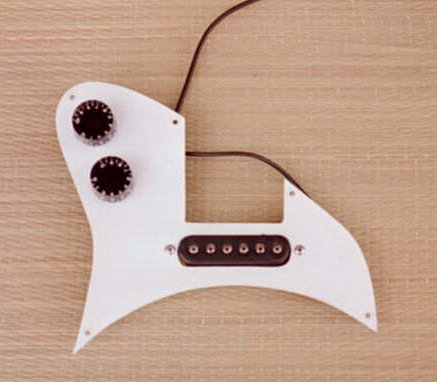 |
I made a pickguard and truss rod cover using a sheet of white .060" plastic pickguard material. I don't have any sort of table saw so I cut it using a hand-held sabre saw with a fine blade for cutting metal. I supported the plastic with plywood while cutting it. I cleaned up the edges with a file and sandpaper. The pickguard turned out fine although it doesn't have the nice beveled edge of a manufactured pickguard. |
The guitar originally had cheap humbuckers in it. There was no room for a humbucker in the neck position. I disassembled one of the humbuckers and made it into a single coil pickup. The pickup was a "70's earthtone" cream color which clashed with the guitar so I painted it black.
When playing through an amp using the pickup, it seems to lose a lot of the resonator quality and ends up sounding a lot like a normal electric guitar. Originally I didn't plan to have an acoustic pickup but now I'm thinking I need to add a piezo pickup.
I had to relocate the volume and tone controls. The upper bout was the
only available space on the body. It's an unusual location but fortunately
the knobs don't get in the way.
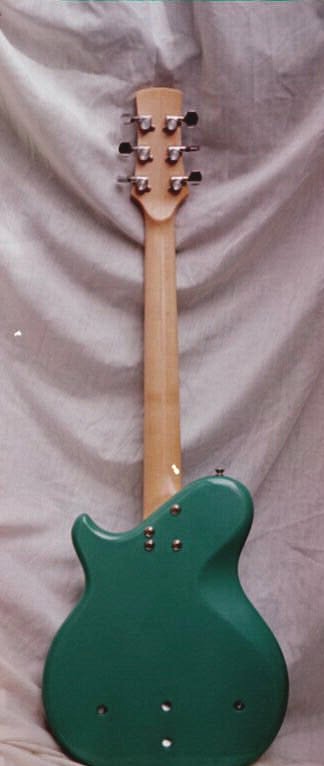
The holes in the back
The first time I assembled all the pieces and played the guitar acoustically I was disappointed in the sound. It didn't seem very "full". It had a "boxed in" sound; like the sound of an amp being played through a small speaker.
The cone did break in after a few days. It sounded a little better, but still not very good. I tried raising and lowering the tailpiece to change the break angle off of the bridge but it didn't make much difference.
Figuring that the "boxed in" sound was the result of the cone sitting
in a tiny closed cavity I took a chance and drilled a few 1/2" diameter
holes in the back of the body to "open up" the sound. It was a dramatic
improvement. It's still not as rich sounding as an acoustic resonator guitar
with a big resonating body, but it's not bad.
Finish
I refinished the neck with clear gloss nitrocellulose lacquer. I used an opaque lacquer for the body with clear lacquer topcoats. The body grain was unexceptional and an opaque finish seemed much simpler than a stained wood finish. I used Bondo to fill a cavity in the back where the strings passed through the body.
From the pictures it may look like the guitar is a trendy teal green, but it is actually Sherwood Green, the same color found on 60's Stratocasters.
I used canned aerosol lacquers from Guitar
ReRanch. It took less than one can of the colored lacquer and slightly
more than one can of clear lacquer to finish the body and neck. I had never
refinished a guitar before. To practice I refinished the neck before I
started on the body. I am pleased with the results and found the process
to be easier than I thought it would be.
Cost
I spent about $90 for the resonator cone, cover and biscuit from Stewart
MacDonald Guitar Supplies. I spent about $50 for lacquer. I probably
spent another $75 on miscellaneous materials (sandpaper, wood filler, Bondo,pickguard
material, resonator blueprint, Stew-Mac book on guitar finishing, etc.).
Am I happy with the results?
Yeah! It's a fun guitar. When it is played acoustically in an open tuning
with a slide it has that nice bluesy, metallic, resonator sound. It's slim
and lightweight and not too loud so it's perfect for playing around the
house.
My advice to others thinking of doing the same
Modifying a Telecaster-style body would have much simpler - there's no belly cut to worry about, plenty of room for a pickup, the existing pickguard can be cut and reused, the existing electronics can be used unchanged and the jack doesn't have to be moved. However you still need to move the volume and tone controls and make a tailpiece.
Feel free to contact me if you have any questions or comments. Visit my home page for other instrument building pages.
Updates:
5/23/00 - initial version
2/04/02 - added circle jig details.
4/15/02 - replaced inline images with thumbnails and links, added uke and Weissenborn links
3/31/06 - moved to new server, added home page link, fixed broken links
4/26/24 - added link to BST-1000 restoration page