GAA's Homemade Ukulele

|
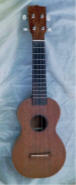
IntroductionThis soprano ukulele was my first attempt at building an instrument. A ukulele is an ideal beginner's project. Compared to a guitar it is simpler to build and it requires fewer materials. However it still requires a moderate investment in tools. In this web page I ramble on about my ukulele building experience. It should be helpful if you're a beginner considering building a ukulele. For you non-beginners or people only casually interested in ukulele construction I'm sure it's more information than you want. Check out the picture below to see how trivial the bracing is. It doesn't get much easier than that!


|
Materials
The body and neck are mahogany, just like a Martin Ukulele. The fretboard and bridge are rosewood. The braces are spruce. I bought nearly all the parts from Stewart MacDonald. They don't supply wood specially cut for ukuleles so I used body, neck and fretboard wood dimensioned for a standard sized guitar. The body top, back and sides were cut from a single mahogany back set. The headstock veneer also came from the same back set. The neck is from a standard 36"x3"x1" mahogany neck blank. It was nice having the extra wood. You have nearly enough wood for two ukuleles (or some extra in case you make a mistake).
I used mandolin fretwire and mandolin kerfing.
The tuners are standard guitar tuners rather than ukulele tuners.
Plans
I got the plans from Elderly Instruments. They sell two different sets of plans. One is for a Martin Style 1 ukulele. The other is a generic set of ukulele plans. They were cheap so I got both.
Either set of plans is adequate to build a soprano ukulele. Both sets of plans are very similar in terms of bracing, body shape, top and back thickness, etc. One minor difference is that the Martin plans have a Martin headpiece while the generic plans have a generic rectangular headpiece.
One nice feature of the generic plans is that it has a table showing how key dimensions would be changed to build a concert, tenor or baritone uke.
Tools
I built the ukulele almost entirely using hand tools. The only power tools were an electric drill and a handheld jigsaw. The drill was used to drill the soundhole and the holes for the tuners. The jigsaw was used to cut out a workboard and to rough cut the top and back. If I wanted I could have used a coping saw to cut the top and back without resorting to using a power tool, but I'm not that much of a purist.
I didn't have a well-stocked luthier's toolbench when I started. I tried to limit myself to buying only those tools that were really necessary. I used the following tools:
- Dial Calipers - a relatively inexpensive plastic model
- 6" Metal Ruler
- 15" Metal Ruler
- Combination Square with 12" ruler
- Fret Slotting Saw with depth guide (the one sold by Stew-Mac)
- Fretting Hammer - any soft-faced hammer would have worked.
- 3 Corner Fret Dressing File
- Fret Nippers
- Backing Saw
- Coping Saw
- Exacto Razor Saw
- Block Plane
- Spoke Shave
- Wood Rasp
- Cabinet Scraper
- Chisel Set - an inexpensive set that goes from 1/4" to 1"
- Four Small Wooden Cam Clamps (from Stew-Mac)
- Electric Side Bending Iron (from Stew-Mac)
- Electric Drill
- Electric Handheld Jigaw
I didn't have a workbench so I bought a Black and Decker Workmate. It is a portable, folding workbench. I did most of my work on it. It made a good work surface. When I later used it to build a Weissenborn I clamped a 2'x4' sheet of plywood to the surface to give me a larger work area.
I didn't want to spend $80 for a set of nut files just to cut four slots in the nut. I got a cheap set of feeler gauges ($5) and used a small triangular file to cut teeth into the metal strips. They're not as nice as a set of nut files, but they did the job.
Construction
To build the ukulele I adapted the guitar building procedure described in the book Guitarmaking: Tradition and Technology by Cumpiano and Natelson.
I deviated from the plans and used a classical-style spanish heel instead instead of a dovetail joint to attach the neck to the body.
I shaped the Martin-style headpiece by cutting a rough shape with a coping saw then using a chisel and rasp for the final shaping. I found it near impossible to get a perfectly symmetric headpiece using handtools. A router would have been quicker and easier but I didn't have one.
I shaped the neck using chisels, a spokeshave and sandpaper. I thought it would be difficult but it turned out to be an easy and pleasant process. I made the neck much beefier than a standard ukulele neck. A fat neck felt nicer to me but I think I also did it just because I could.
I had some tearouts when thicknessing the fretboard with the block plane. If I were to do it over I would only plane on the backside of the fretboard so any tearouts would not be visible. Tearouts can be minimized by keeping the blade very sharp and adjusting the plane for a very shallow cut.
I originally tried to cut the fret slots using a standard mitre box. It resulted in some sloppy fret slots. To my surprise I was able to cleanly patch the poorly cut slots with a thin piece of rosewood. I made a small, accurate mitre box out of hardwood for cutting the fret slots. It worked much better.
I used a block plane to thickness the top, back and side pieces. A smoothing plane is the proper tool to use because its larger, but for these small pieces a block plane was fine.
I cut the soundhole with an inexpensive circle-cutting drill bit and my handheld electric drill. The rosette channel (such as it is) was cut before drilling the soundhole. I used circle-cutting drill bit that was slightly larger than the soundhole and carefully drilled only part way into the soundboard.
The side got scorched slightly when making the tight bends for the waist. It looked pretty bad but it was only on the surface. I was able to clean it up with sandpaper and a scraper. It did require a fair amount of sanding and scraping.
The finish is nitrocellulose lacquer sprayed on from aerosol cans. The pores are filled with grain filler.
There is a slight (and unintentional) asymmetry to the body that is not obvious in the picture but is noticible in person. Building this instrument really changed my sense of aesthetics. I no longer expect a handmade instrument to have the "perfection" of factory made instrument. Instead I find the imperfections give it a natural, handmade charm.
Modifications
|
I made two modifications to the ukulele after I completed it. In its original form it had a mahogany bridge and the body was not bound. I chose not to bind the body because I didn't want to invest in the tools to cut the binding ledge and wasn't sure of my abilities. After about a year I started having problems with the strings slipping out of the slots in the bridge because I cut the slots too wide. To fix the problem I sawed off the old bridge and made a new one out of some rosewood scrap from the fingerboard. Since I had to refinish it I decided to add some binding. I used a Stew-Mac binding cutter that I had acquired in the interim. Click on the picture to the left to see before and after views of the ukulele. It certainly looks dressier with the binding. |
Advice
If I were to do it over again, I'd build two ukuleles at the same
time. A lot of the construction time is spent setting up jigs or getting
yourself mentally prepared to execute a step. It wouldn't take much
longer to build two of everything. The additional material costs aren't very significant.
It gives you a chance to practice each step and you can "cherry
pick" the best parts so you'll end up with one uke that has a minimal
number of flaws.
Links
- Frets.com has an excellent history of the Martin ukulele.
- Stewart MacDonald Guitar Supplies is a good source of parts.
- If you're interested in building instruments, visit the Musical Instrument Makers Forum. It's a valuable source of information and advice.
Feel free to contact me if you have any questions or comments. Visit my home page for other instrument building pages.
visits since April 24, 2002
Updates:
4/15/02 - initial version
4/23/02 - added tool list and construction details
5/18/03 - posted a newer picture of the uke, added description of modifications
4/14/04 - added link to Cookie Tin Banjo
3/27/06 - Moved to new server. Added link to home page.